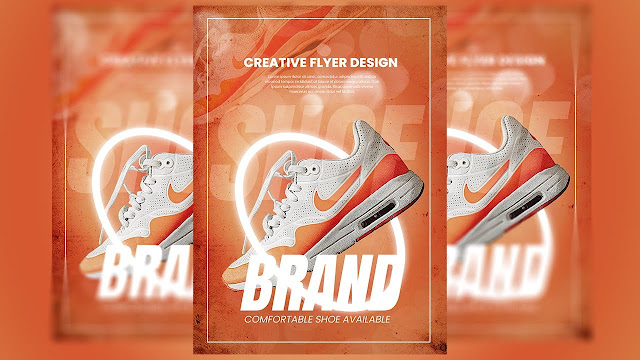
How to Design a Brand Shoe Flyer in Adobe Photoshop

Flyers are an effective marketing tool, and a thoughtfully designed flyer can capture the attention of a brand product. In this guide, we will walk through the step-by-step process of making a stunning flyer for a shoe brand using Adobe Photoshop. From setting up your workspace to adding eye-catching design elements, this guide will cover it all. Whether you are a graphic designer or a brand manager, follow these steps to create a professional and visually appealing flyer.
Why Use Flyers for Shoe Brands?
Flyers are one of the most effective ways to communicate a brand message visually. A shoe brand flyer can highlight the product features, evoke the brand identity, and engage potential customers with a compelling design. Unlike digital ads, flyers can be handed directly to potential customers, giving a tactile experience that often leaves a lasting impression.
"A flyer does more than highlight a product; it weaves a story that engages the audience and forges a connection with the brand."
What You Will Need
- Adobe Photoshop (any version will work, but Photoshop CC )
- High-quality images of the shoes you want to feature
- Logo and branding elements of the shoe brand
- Creativityand a general idea of the brand style and message
Step 1: Setting Up the Document
1. Open Adobe Photoshop.
2. Click on File > New and set up your document.
- Dimensions: For a standard flyer, use 8.5 x 11 inches.
- Resolution: Set to 300 DPI for high-quality print.
- Color Mode: Use CMYK for print designs.
File > New > Width: 8.5", Height: 11", Resolution: 300 DPI, Color Mode: CMYK
Step 2: Choosing the Right Background
A well-chosen background sets the mood of the flyer. For a shoe brand, consider using a sleek, minimalist background that keeps the focus on the product.
1. Select the Paint Bucket Tool (G) or the Gradient Tool to fill the background with a subtle color that complements the brand's identity.
2. For added depth, try using a gradient from a darker shade at the bottom to a lighter shade at the top. This can give the flyer a more dynamic look.
Pro tip: Use a neutral or brand-specific color to maintain consistency with other branding elements.
Step 3: Add Product Images
Now it’s time to showcase the shoe! Choose a high-quality image that displays the product clearly. This image will be the central focus of the flyer, so select one that is sharp, high-resolution, and captures the details of the shoe.
1. Go to File > Place Embedded and insert your image.
2. Resize and position it in the center or slightly off-center for a balanced composition. Hold down Shift to maintain the aspect ratio while resizing.
How to Make the Shoe Stand Out:
- Add a shadow effect to create depth and make the shoe look like it's popping off the page.
- Right-click on the shoe layer and select Blending Options.
- Choose Drop Shadow, adjust the distance and spread to create a natural-looking shadow.
Step 4: Brand Elements and Logo Placement
Adding the logo is essential for brand recognition. It’s best to position the logo in a prominent spot, such as the top or bottom corner, where it’s visible but doesn’t overpower the main image.
1. Import the logo by going to File > Place Embedded.
2. Resize and place it, keeping in mind the overall composition of the flyer.
Consider using the Opacity slider to slightly reduce the logo’s prominence if the design starts feeling too cluttered.
Step 5: Add Text and Key Information
Text placement is crucial in guiding the viewer’s eye through the flyer. Start with the main message—something short and impactful that describes the product, like “Step Up Your Game” or “Unmatched Comfort, Exceptional Style.”
- Headline: Use a bold, clean font for the headline that reflects the brand’s style.
- Subtext: Add supporting information such as product details, unique features, or pricing.
- Call to Action (CTA): Every flyer needs a strong CTA. Examples include “Shop Now,” “Visit Us Today,” or “Discover More.”
Step 6: Add Decorative Elements
To elevate the flyer’s design, add subtle decorative elements. However, keep these to a minimum to avoid distracting from the product.
- Shapes: Use the Shape Tool (U) to add circles, lines, or other shapes that can frame the shoe or headline.
- Textures: Add a slight texture overlay to create a unique look and differentiate the flyer from other marketing materials.
Step 7: Add Finishing Touches
With the main elements in place, take a moment to refine the design.
- Alignment: Use Guides to ensure all elements are aligned properly.
- Contrast: Adjust the brightness or opacity if needed to make text and images pop against the background.
Step 8: Save Your Flyer for Print and Web
When you’re happy with your design, it’s time to save the file.
- For print: Save as a PDF or high-resolution JPEG. Ensure the Color Mode is set to CMYK for printing.
- For web: Save a copy in RGB color mode as a smaller JPEG or PNG file to share on social media.
Key Takeaways
- Choose High-Quality Images: The shoe should be clear and well-lit.
- Effective Use of Text: Use clear, bold fonts and keep the message short and impactful.
- Add a Call to Action: Make the CTA prominent and action-oriented.
Your download link will appear in 60 seconds.
Conclusion
Creating a compelling flyer for a shoe brand in Adobe Photoshop is a straightforward yet creative process. By following these steps, you can craft a design that not only looks great but also effectively communicates the brand’s message.
If you have any quary let me know