Hi There, Thank you all for those who are reading this text tutorial. Today Grapocean presents face wash tube packaging design in Photoshop cc. So please keep following my steps to design this product packaging. Facewash tube is one kind of beauty product. If you want to create this type of product packaging design on your own, you can make it, but you need to concentrate on color and shape so that the design looks professional. And you can use this design for print. Let's start the tutorial without further ado.
Design Ingredient:
- Adobe Photoshop ( Note: Use the latest version software )
- Stock Files
- Fonts Name- Myriad Pro, Akrobat

Here I show the design basic fundamental structures. For those who require to learn basic graphic design and want to make a design stand out very quickly, this tutorial will help them. Before starting the design, please follow the design ingredients.

So in the first step, we require to open the Photoshop program (Note: Make sure you have the earlier version adobe photoshop program on your pc). After opening adobe photoshop, we have to create a design document artboard. So that we can make the design structure on it. Create a design artboard, click on Create New Or, directly press Ctrl + N from your keyboard. When doing this, a document-making dialog box will open. Then put in preset details "Face wash Tube Design" and filesize width 851px height 1544px And make the Resolution 300px and please check you select CMYK color mode. Then click on Create.

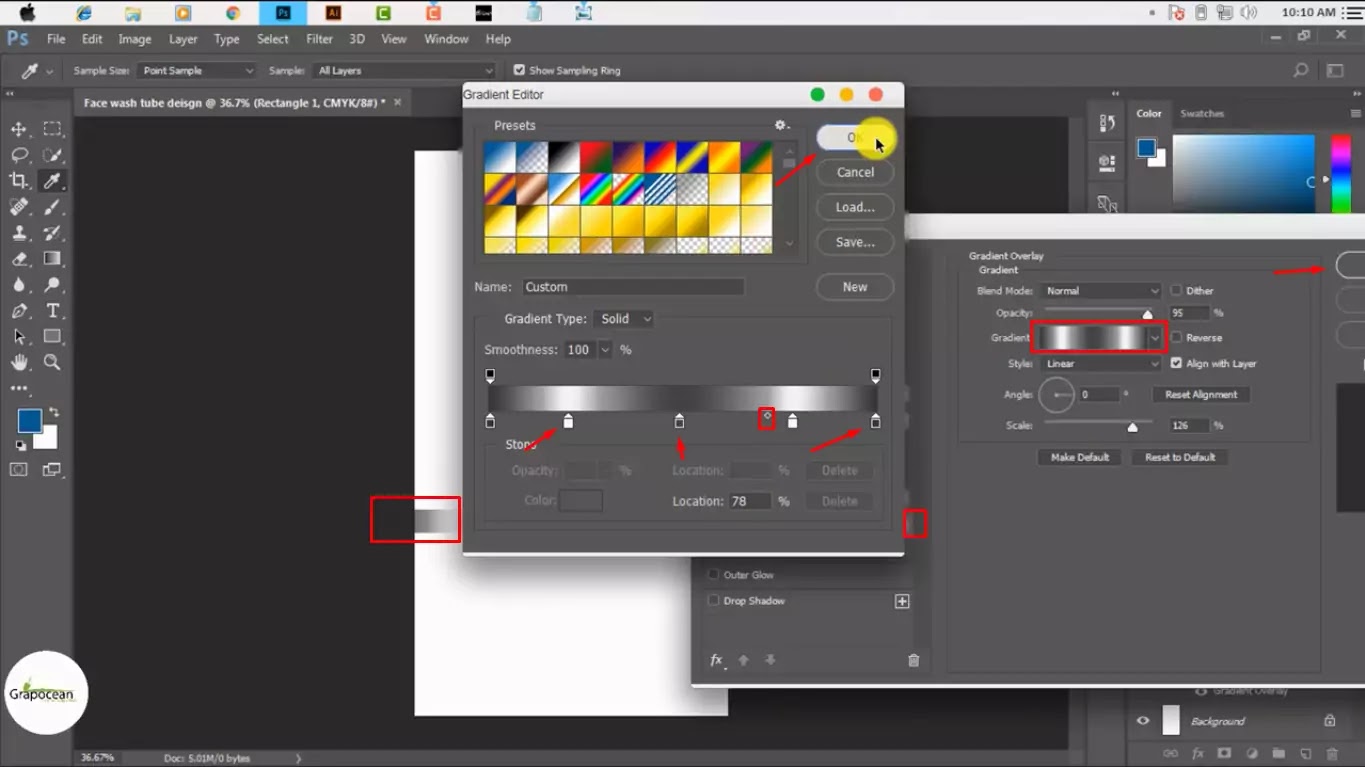
After the design artboard is visible on photoshop, click on the Photoshop Shape Tool and select the rectangle tool to draw a rectangle shape. After creating the rectangle shape, go to this layer Blending Option by double-clicking on the layer thumbnail. When the blending options dialog box opens, check the Gradient Option from there. Now picks a silver color gradient. If you don't have the silver gradient, you can make it your own by editing the color stops. You can make the silver gradient by white and black color combination. However, To edit the gradient color, click on the right-side color stops and select a little black color. And then click on the left side color stops and pick white color. Now hold Alt and drag the color stops to make several copies of black and white color stops. Then click on OK.

Now make another copy of this silver gradient layer by pressing Ctrl+ J. Now drag this copy silver shape a little bit on top of another silver shape. Now we make the plane shape curved. To do this, press Ctrl+T from your keyboard or go to the top Edit menu > Free Transform to open the free transform properties. In the properties panel, you will see the transform warp option on the top. Now click on the transform warp icon on the top. You can easily carve the shape by dragging the transform warp Anchor Points. After carving that silver color shape, make a green shape using the pen tool. Make sure this green color shape covers the gap from the top sliver shape layer to the bottom white area. Now send the green layer behind the silver gradient layers by pressing Ctrl and down arrow. Then transform warp another silver shape press Ctrl+T do the same process of the transform warp.


In this step, bring the Aloe vera image from the computer stock folder. To fetch the product photo, on the design artboard, click on File from the top menu bar and then click on Open and after then select the aloe vera image and click on Open to bring it on the design artboard. Now we will remove the white background behind the aloe vera and make it transparent background. So we can put this image on any color background we want. To make this photo transparent, first active the aloe vera image layer and click on the Magic Wand Tool and then just one tab on the white background of the aloe vera image to make a selection. For the white background, the magic wand tool automatically selects the aloe vara area. When the selection mark is visible, unlock the layer by clicking on the layer thumbnail lock icon. Then just press Delete from the keyboard to erase the white background area from Aloe vera. Then drag and drop this transparent image on the main design artboard.


Now click again on the Rectangle Shape Building Tool, and make a horizontal shape. And use the same green color as the shape fill color. After that, click on Type Tool and type your branding and increase font size a little bit. Then right-click on the shape building tool and click on the custom shape tool. Now draw a leaf shape using the custom shape tool. You will get this type of leaf shape inside the custom shape tool's large list. After creating that shape, drag this shape up on the Alofeaa text. Keep in mind, it's just demo branding. You can directly put your branding logo on the top. After that, type all text. That you want to put on the design and align the text nicely. Now press Alt+Ctrl+ Shift+E from your keyboard to merge all layers into an image layer.

In this step, we will put the design on the 3d mockup file. This is an optional part of the design. Usually, we use 3d mockups to highlight products on an online website. It's is not essential for printing. If you only need printing, you can avoid this step. However, open the mockup PSD file and double click on the "But your.." smart layer. When you double click on it that a pop-up design tab will open. Now drag and drop your artwork image on the layer and press Ctrl+S or go to File and click on Save to save the smart layer. So, your artwork will be visible on the mockup file.

I hope all your conflicts are gone. If this tutorial to be of little benefit to you, please share the tutorial. If you have any difficulty understanding this post, then you can comment below the post. I will try to reply to your question. So no more today. See you in my another new photoshop tutorial episode. Till then, take care.
great but where i get you filr
ReplyDeleteThanks for read this text tutorial
DeleteSimply desire to say your article is as astonishing. The clarity in your post is simply excellent and i could assume you are an expert on this subject. Well with your permission let me to grab your RSS feed to keep updated with forthcoming post. Thanks a million and please continue the gratifying work. LD packaging pouches
ReplyDeleteSomebody essentially assist to make seriously articles I would state. That is the first time I frequented your website page and to this point? I amazed with the research you made to make this actual put up amazing. Great process! Baopackauto vertical packaging machine
ReplyDeleteexcellent explanation .
ReplyDeleteThanks for reading this post. I hope you would benefited
Delete