Introduction :
Welcome to the text version tutorial. In this tutorial, I will show you step by step how to create a professional web banner in Adobe Photoshop. This tutorial is about the landing page design concept. Most of the time, We display our products and services through the landing page. Today I will show you that beautiful web banner design. So let's start the design process.

Tutorial elements and general Information:-
- Size- 1280x700
- Resolution : 300 DPI
- Color Mode : RGB
- Template type : PSD

Before we start each design, we have to create an artboard where we design. In other tutorials, I have shown you how to create a design artboard that you can see if you want or, I have mentioned above the design artboard size you see that and create a design artboard. After making our design artboard, first, we will make a beautiful background. To do this, I have used the most used Rectangle Tool and draw a shape over the design canvas. Make sure it covers the total artboard. After making the shape, I clicked on the color Fill box and chose a Gradient from there. And edit the gradient color purple and blue. You can see the slider. I have marked those three colors of this gradient using the round box.

In this stage, we will make a circle shape and colorize it. I use the Ellipse Tool and draw a circle shape on the top right corner of the design artboard. When you draw a circle, you will see a layer created name Ellipse 1. After making that circle turn off the Fill color of the circle shape and turn on the Stroke. Then chose a blue Gradient color as the Stroke Fill. Now increase the stroke size (75.64px). you can extend the stroke size as your requirement. But remember that you should not fill the whole circle with stroke fill. Our work here is over now we move on to the next step.

In this step, we will be applying some colors and brushes over the circle to get a 3D effect. To do this, we first need to create a blank layer on top of the circle layer. Here I click on the plus icon box to create an empty layer. Now we will choose a dark blue color as a Foreground color then the gradient color we applied to the circle. After that, we will click on the Brush Tool and pick a soft round brush. In that case, the used brush name is "80".
After setting those three things, We will make a selection over the circle stroke to make the selection, hold Ctrl and Click on the circle layer icon from the layer panel. When you see the selection mark has appeared, then run the soft round brush inside the selection. In that case, light comes to form upper direction. That is why I run the soft brush down inside the selection mark. Now we use the soft round brush again, and this time, we will pick light blue colors (#00c6sf) as the Foreground color and run the soft brush up inside the selection. When you did this, you will see the difference in the flat circular shape. It will now look like a 3d shape. Now we will make the 3d effect more realistic. To do this, make another new layer, and use the same soft round brush and use the same light blue color (#00c6sf) and tab on the circle shape. But this time-release the selection so that it is not inside the circle stroke. Now change the layer mode Normal to Hard Mix. It will make the light more brighten.

In the same method, we will create a second 3d circle. But here, I apply some different techniques. As before, I have created a circle. with a stroke size (81.09px). and use a purple gradient as it Stroke color and turn off the Fill. And make a new blank layer behind the circle layer and again use the soft round brush. This time I use light pink color as the Foreground color to highlight the circle. After Making those aging, I create a new layer top on the second circle layer and change the foreground color more brighten pink and tab the brush one time, and then I Clipping Mask brush stroke with the circle. After that, we will add a glow around the circle stroke. To implement the glow, double-click on the second circle layer icon from the layer panel to open its layer-style window. Now check the Outer Glow box from there and pick the same light pink as the glow color.
In this step, we will bring a smartwatch transparent image from our computer's hard drive. To open the photo, press Ctrl+Shift+O from the keyboard. Then select the image and click on Open. Now we drag the image to the design artboard, and after that, we adjust this smartwatch color to the background color.
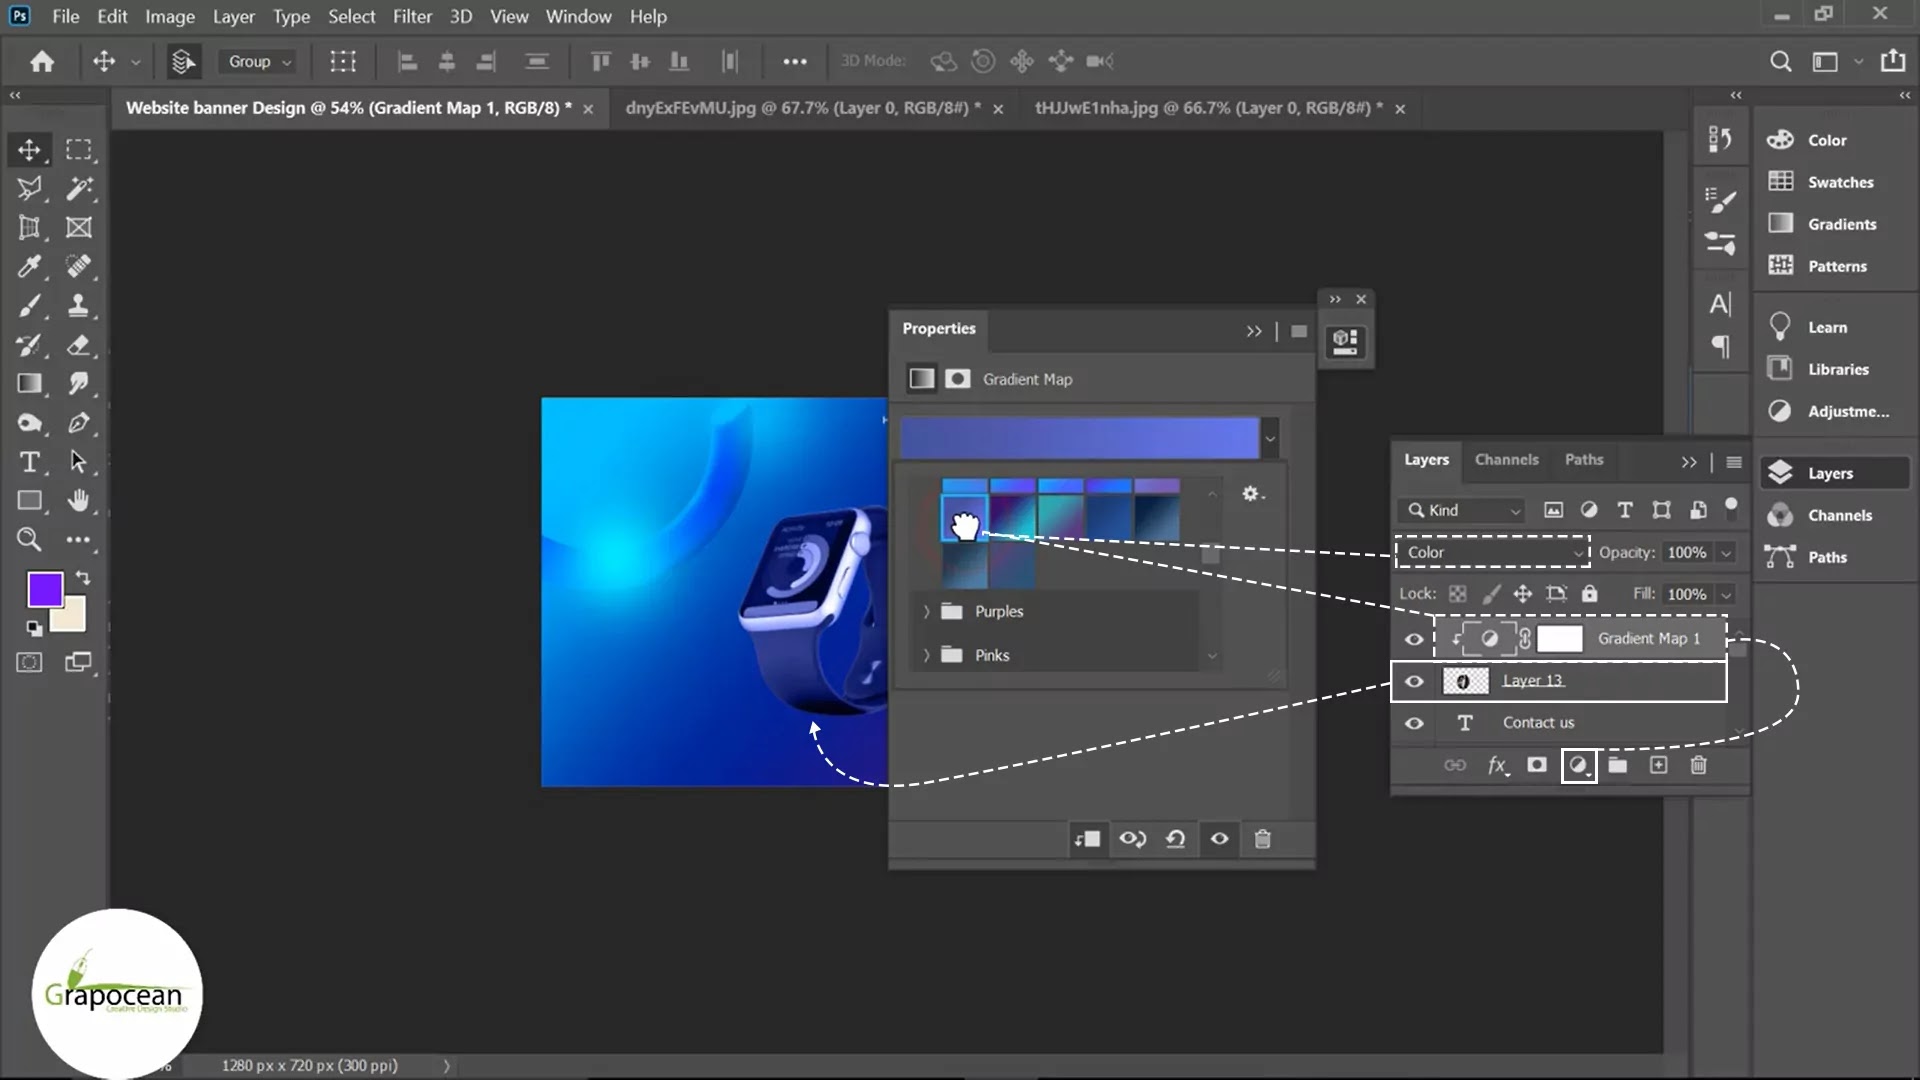
For that, we have to create a Gradient Map layer. Click on the small ball (create new fill or adjustment layer) icon. After clicking on the ball icon, you will found the gradient map option. From there, click on it and pick a gradient color that matches the background, and then Clipping Masks the gradient map layer with the smartwatch photo layer. After that, change the gradient map layer mode Normal to Color. Now move the smartwatch photo inside the circle make a shadow under it. To make a shadow, I create a blank layer, and I use a soft round brush and pick the black color as the Foreground color, and then I decrease the opacity of the brush 100% to 73% and run the soft brush to make a realistic shadow.

In the last stage, I have used the use Type Tool and type all the texts that I wanted to input the banner. After type all the text, I decorate them and align them perfectly. After that, I make a Call-To-Action Button. for making this button, I using Rounded Rectangle Tool and make a round shape, then I implement a purple and blue color gradient on it. The banner is complete. Now you can make some coding and can use your banner on your website hero section.
Thank you for patiently reading this article. If you have benefited, please share that post so that others also get the benefit.
Hi,
ReplyDeletehow much cost a website banner like this?