Hello Everyone, Greetings to all of you, and thanks for reading this text tutorial. Today I will describe how to design beautiful chocolate packaging using Adobe Photoshop. Do you want to learn how to design product packaging in photoshop? then, please keep following this tutorial step by step. You may need some design materials to design this chocolate packaging.
Design Ingredient:
- Adobe Photoshop ( Note: Use latest version program )
- Stock Images
- Mock-up ( Sorry somehow this tutorial stock image and files are missing)
I hope this tutorial will be helpful for beginners who want to learn graphic design product packaging easily and quickly. Every designer can also follow this tutorial. I describe the design methods here very easily. So let's start the tutorial.
First, open your Photoshop program by double click on the program icon. (Note: make sure the adobe photoshop earlier version is available on your pc). Then press Ctrl + N or click on Create New to create a new document. When you click create new, Then the artboard-making dialog box will open. Now put file name and file size (width 1210 x height 480px) and make Resolution 300 and Background Contents "White" make sure you select CMYK color mode. (Note: IF you use those documents for the web platform, select RGB color mode. And if you won't use those files for print, Use CMYK color mode. Then click on Create.
After the design artboard is visible, go to File>Open then bring all stock images. Then unlock the coffee image and drag it on the main design artboard. After that, click on Edit and go to Free Transform to adjust this coffee image with the artboard. Then go to Layer Panel and click on the Adjustment layer icon, which icon I red marked in the screenshot. Then click on the Solid Color. After that, pick a similar color of coffee using the Eyedropper tool. So that, the design background looks perfect with the coffee. Then click on Layer Mask (not layer). After that, click on Gradient and select one of the transparent effects gradients. Or click Eraser Tool from the Photoshop sidebar. Then use one soft round brush and run that brush over the layer mask. After that, you will find this fade effect.
Secondly is the other two images ( Wave effect Chocolate and chocolate.) Since these two images are already open in Photoshop. So just unlock the layers by clicking the layer lock icon and bringing them to the main Design artboard. After that, press Ctrl+T to adjust the size of both images (Make sure the chocolate image background is transparent so that you can put this on any kind of background). Then alien these layers perfectly. As I did in the screenshot.
After the adjustment of the image size with the design artboard. Click on the Type Tool from the Photoshop side toolbar and select Chocolate bar demo font. Then type "Chocolate Packaging design". After that, make the font size bigger as much as needed. So that it is consistent with the design artboard.
Now click on the shape Building Tool from the Photoshop side. And create an ellipse shape after that click this shape fill and select the white color (#ffffff). Then drag this shape upper and set in it a perfect place. Then again click on Type Tool and type "100% safe Testy"
Then let's move on to the next step. Here we have to click on the first Text layer (Chocolate packaging design) Blending Option by double click on the layer. In the blending options dialog box, checkmark the Stroke and pick that orange color (#dd4527) as the text layer stroke. Then click on OK. After that make a custom shape and type 15px, and bring it up on the shape. Then press Ctrl+Alt+Shift+E to merge all layers into an image layer.
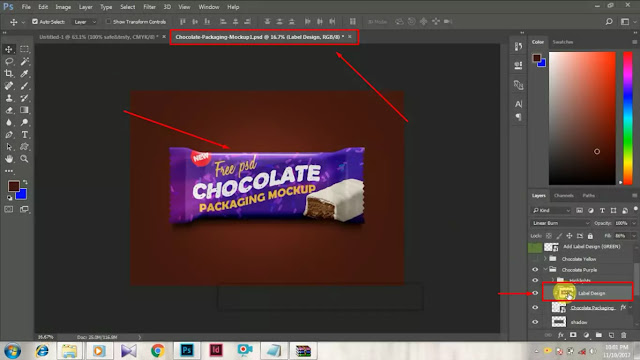
Now again go to the stock files folder in your local drive. Then open up any chocolate packaging mockup PSD by double-clicking on it. Now double click on the "label design" smart layer. Then it will open in a new popup window in Photoshop.
Now drag your designed image layer on the mockup popup layer and then adjust your design with its artboard. Make sure your design layer covers the whole artboard. Then go to File and click on Save. Your design is now successfully saved on the mockup. Thanks for patiently reading this tutorial.
If you have any difficulty understanding this text tutorial. Then check out my video tutorial. You will find it on my channel.


2 Comments
Tagger enables a quick creation of documents in minutes by importing coloration and applies it and follows rapid techniques in a clever form to generate bond files for the manufacturing unit. The device employs pattern recognition exercises to locate bond points and number figures Packaging Design Tools.
ReplyDeleteThanks for visiting
ReplyDeleteI hope you would benefited
If you have any quary let me know